Writing a resume with Typst
published: Jul 24 2024
Recently, I have found myself needing to update my resume (which I should do more regularly) to stay up-to date with my Co-op program. I also recently started to learn how to write documents using Typst. This lead me to decide to redo my resume but this time using Typst, and after seeing how easy and simple it was to write it using Typst, I thought I would share my experience and my modified template for it.
What is Typst?
Typst is an open-source markup-based typesetting system for sciences (like LaTex) developed in Rust. It was designed to be an alternative to tools like Word, Google Docs, and LaTex. It was developed by two German graduates from Berlin fed up with LaTex.
But seriously, what does that even mean to be an open-source markup-based typesetting system? The simplest way to see it in my opinion is that Typst is a programming language and tool to make pdf. Typst has its own syntax and functions, but it can also understand a few other languages with which you can program some extra functions for your project. Before you need to program your own components, you can also check-out Typst Universe, their plugin and template bank where there is already tens of template and plugins help you with things like a template for a cover letter, or making different type of graphs, or even playing Tetris (no, I’m not kidding, that is an actual template). Lastly, like I mentioned earlier, Typst’s CLI is open-source, which I am always for! The CLI is easy to install, and it has a lot of support with different code editors (like NeoVim or VSCode). Typst also has a proprietary online application that works like Google Docs and is completely free for personal use.
Project setup
Now that we know what Typst is, we can start working on our resume. The first step is to import and create the template for the resume. My favourite template for this, which we’ll use here, is chicv 0.1.0. Other template might fit what you are looking for better, but I like the simplicity of this one. But there is a few tweaks I do which makes it better in my opinion.
But first, let’s initialize the project, and we do that with this command:
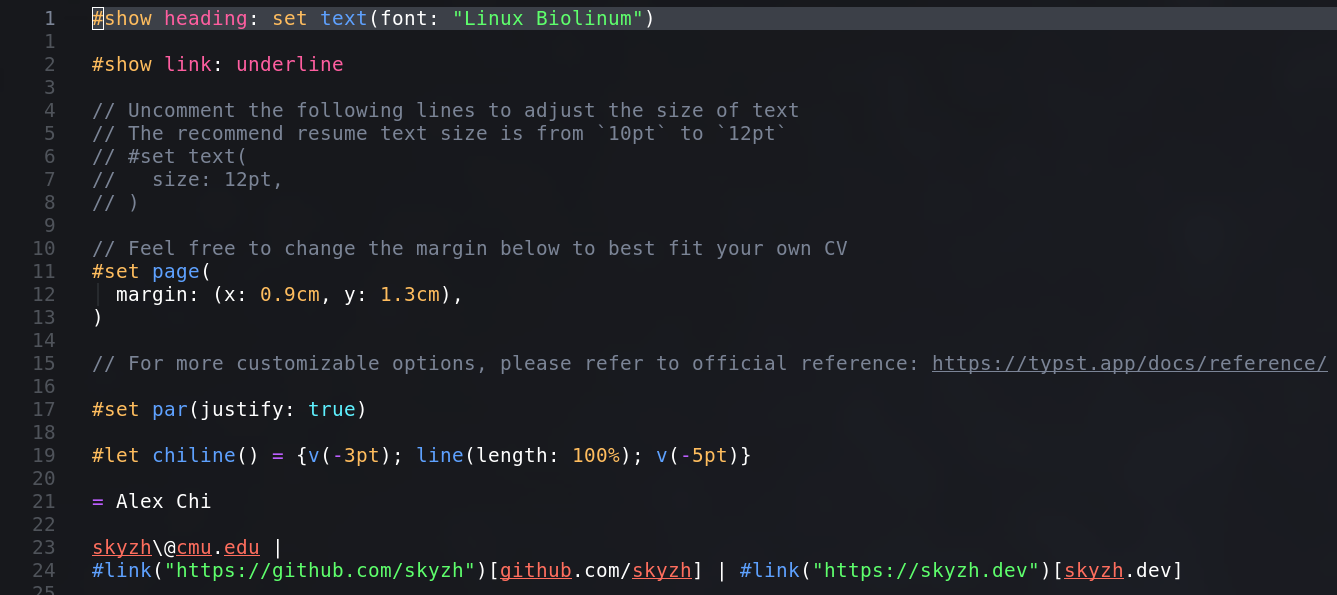
typst init @preview/chicv:0.1.0This will create a copy of the template project in your current folder. Now if you open it in your code editor, you should see something like this:

Before moving to the next section, there is two things left to do with the project to get ready to right: import an icon plugin and install font-awesome to use said icons. For font-awesome, you can click here to download it on your machine. Finally, once that the icons are installed, we can add this line at the top of the template:
#import "@preview/fontawesome:0.2.1": fa-location-pin, fa-envelope, fa-link, fa-github, fa-linkedin, fa-phoneThis line imports the font awesome plugin to the project, and specifically imports the few icons we will use, the location pin, the fa-envelope, the link, GitHub and LinkedIn’s logos, and the phone. Last step is to start in your terminal the watch system so that every time you save the project, your pdf will be automatically updated:
typst watch cv.typNow that everything is imported and set up, we can start writing the resume!
Writing the resume
Header
We will start with the header of our resume (your name and contacts). I like
the way the header looks now, but I think we can make it look better. First,
we should make our name centered and bigger. We will use the #align()
component for that, which would give us the following code:
// replace = Alex Chi with:
#align(center, text(20pt)[= *Gab Savard*]) // The = means it is the project's title, useful for pdf sections
And now if we save our file, we should see this (with your name):

Next, we should add the contact row so that recruiters know how to contact us.
This is when the icons will come in handy, we will again add an #align()
component to make the line nice an centered, then we can add our icons and info
or links. The following code would replace the line right under the title:
#align(center, [
  // First we add the icon we want, then our info and I like to add a little
  // horizontal spacing between the locations
  #fa-location-pin() 111 Wellington St, Ottawa #h(10pt)
])
We can now add as many things as we want in that area, here is what I will do:
#align(center, [
  #fa-location-pin() 123 Mondeau St, Gatineau #h(10pt)
  #fa-phone() +1 (123) 456-7890 #h(10pt)
  #fa-envelope() #link("mailto:contact@gabsavard.com") #h(10pt)
  #fa-link() #link("https://gabsavard.com")[gabsavard.com] #h(10pt)
  #fa-github() #link("https://github.com/sp0k")[Sp0k] #h(10pt)
  #fa-linkedin() #link("https://ca.linkedin.com/in/gabsavard/en")[Gab Savard]
])
Last thing for the header, we could save a little space by getting the contact
line higher. To do this, we can us the #v() component and declare a negative
spacing. I like using #v(-3pt). Finally, our header code should look like
this:
#align(center, text(20pt)[= *Gab Savard*])
#v(-3pt)
#align(center, [
  #fa-location-pin() 123 Mondeau St, Gatineau #h(10pt)
  #fa-phone() +1 (123) 456-7890 #h(10pt)
  #fa-envelope() #link("mailto:contact@gabsavard.com") #h(10pt)
  #fa-link() #link("https://gabsavard.com")[gabsavard.com] #h(10pt)
  #fa-github() #link("https://github.com/sp0k")[Sp0k] #h(10pt)
  #fa-linkedin() #link("https://ca.linkedin.com/in/gabsavard/en")[Gab Savard]
])
Once we save all this, we end up with this header in the pdf:

Profile
Next, we should write a little profile about ourselves. The template doesn’t
come with a profile section, but we will very easily add one. We will use the
== to indicate the beginning of the new section. This tells the pdf that
there is a section starting at that line with the title on that line. It would
look like == Profile. Next, under the section’s header, we can add our text:
== Profile
#chiline() // This is a component in the template, it creates a page-wide line

Enthusiastic and detail-oriented Computer Science student with a strong
foundation in web development and video game programming. Proficient in
multiple programming languages and frameworks, with hands-on experience from
participating in various game jams, including the Global Game Jam. Adept at
problem-solving and collaborative projects, consistently delivering
high-quality results. Seeking opportunities to apply technical skills and
creativity in challenging projects.
This would then give us this pdf:

The rest of the resume
After our profile, we see that the template already has an Education section.
In this section, we can find an example of code looking like this:
#link("https://typst.app/")[*#lorem(2)*] #h(1fr) 2333/23 -- 2333/23 \
#lorem(5) #h(1fr) #lorem(2) \
- #lorem(10)
The code above is gonna be repeated in the other section, and is the last thing we need to understand how to use. You can put a link or not for the name, it’s up to you. For now, let’s add a degree to our resume:
#link("https://www.cs.ox.ac.uk/")[*Oxford University*] #h(1fr) Sept. 2020 -- May 2024 \
Bachelor of Computer Science #h(1fr) Oxford \
- Graduated with a 4.30 GPA
- Specialized in Micro-Robotics
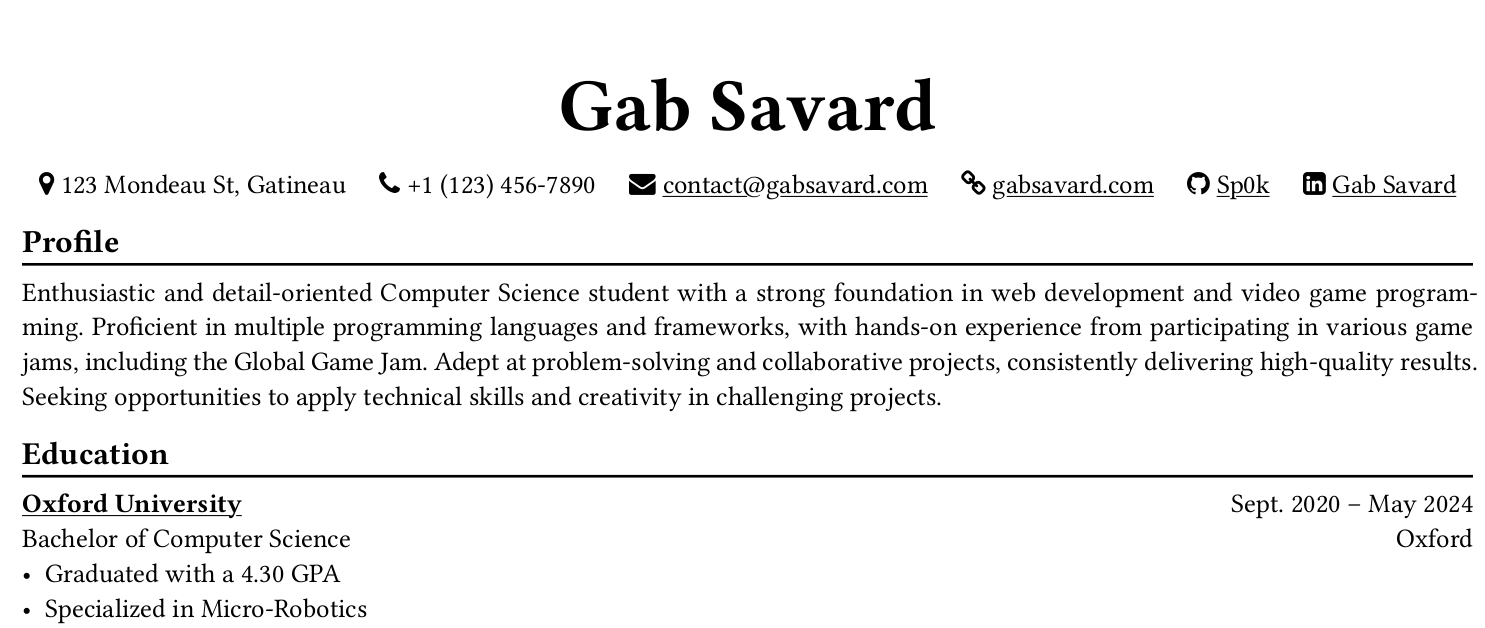
Like that, our diploma looks like a mess, but when we save and look at the pdf, it should look like this:

So with all the code we wrote so far, we should have a resume that looks like this:

The rest of the template is pretty straight-forward. It uses every we have seen so far. From my experience and what I learned in class, a Computer Science resume usually has the following sections: profile, education, work experience, projects, and volunteering (if you have any experience to put here).
Final thoughts
Everyone needs good resume, that’s not a controversial opinion, and a good looking one that displays the information efficiently and nicely will give you an advantage in my experience. What I like about this template is how compact yet readable it is. Furthermore, using Typst lets us customize the resume exactly how we want, making the styling of it much more precise. Over the last few months, I have grown more and more fond of Typst, and writing my resume with it just proved to me how good of a tool it is.
© Copyright 2026. Made by Gab Savard.